


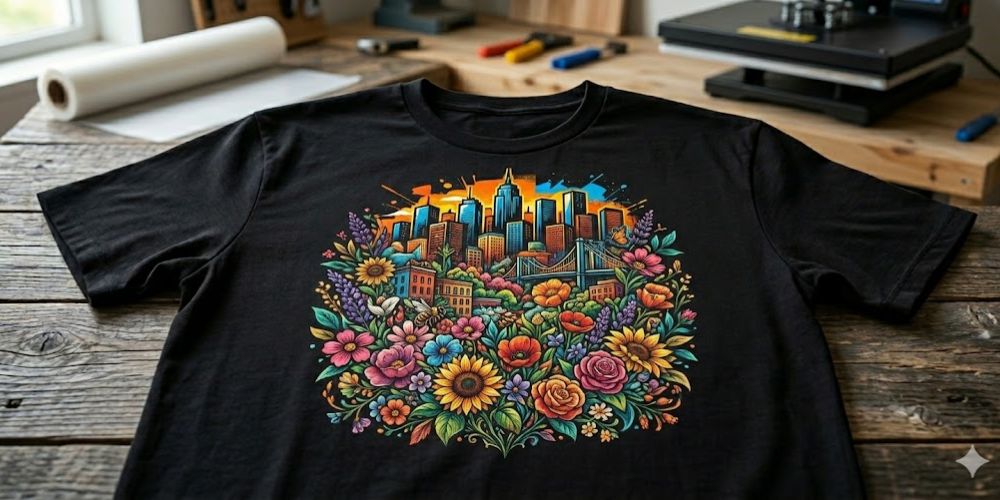
Moving black shirts. This is common knowledge for any bespoke clothing company that has been in operation for longer than a few months. For parties, bands, companies and individual endeavors, they are in high demand. The demand is stable. One of the first things most decorators discover is how much more difficult it is to print on dark material compared to lighter cloth. The difference between a professionally done print and one that appears like it was done in someone's garage is much wider on dark material.
But Mad Monkey Transfers is an expert in this field, and the reality is very different. On this page, you will find subject-specific guidance.
Just Because Black Isn't Any Old Color
White shirts may be rather lenient. A mediocre method yields a decent outcome, colors go down precisely, and the cloth does not fight the ink. None of those things applies to black fabric.
Dye is absorbed by darker materials. Without a foundation layer, any ink pressed directly into the cloth will be absorbed by it, rendering it instantly dull. What was vibrant on the screen is subdued and unappealing on the garment. The fundamental issue that distinguishes black shirts as a distinct skill set rather than merely a configuration modification is this.
This must be considered initially in all stages of the DTF process when working with dark fabric.
Important Design Choices to Make Prior to DTF Printing
It doesn't matter what color shirt your artwork is on; most people arrange it in the same way. At that point, problems begin to arise.
Using contrast as a starting point is essential for black shirts. Dark cloth often makes delicate patterns, such as gentle gradients, delicate lines, and subdued tones, that appear fine on white fabric vanish. If you want your design to stand out on a shirt, use bold colors, sharp edges, and great contrast between pieces.
Instead of white, the file should have a transparent backdrop. An error that is simple to overlook during design, but becomes readily apparent when a white backdrop in the artwork becomes a noticeable white rectangle on the completed product. For output that retains detail at any sensible print size, the resolution should be at least 300 DPI.
Mirroring the design before submitting it to print is an important step that many first-timers forget to do. If the design wasn't flipped before pressing, it would come out on the garment backwards since the transfer is placed face-down onto the shirt.
The Game Is Based On The White Ink Layer
When all other methods of DTF printing have failed, this is the step that turns dark fabric into a success.
First, the printer lays down the complete design in CMYK by running color inks onto the PET film. It continues by printing a thick coat of white ink onto the colored artwork. The white layer interposes a barrier between the pattern and the black fabric when the transfer is applied to the shirt. This stops the black material from absorbing the colors above it.
Even the most striking color combinations will seem washed out on black without a white underbase. It allows the design to be read precisely as intended. The final product's aesthetic quality is dictated by the opacity of the white layer. When pressing designs on black shirts, sometimes they seem washed out because the white coverage is either thin or too uneven. This step is the most critical for using high-quality DTF inks.
Pressing and Setting Adhesive Powder
While the ink is still wet on the film, the design is covered with hot-melt adhesive powder right after printing. Coverage follows the contours of the artwork effortlessly since the powder clings solely to the damp ink.
The film then goes through a drying step after the excess powder is shaken off. The conventional method calls for a curing oven set at around 160 degrees Celsius for a duration of two or three minutes. The powder forms a uniform coating that adheres to the ink as it melts. It makes no difference how carefully you press a transfer that misses this phase or emerges from curing unevenly; the transfer will not stick correctly to the shirt.
Struggling for Viable Outcomes
Prior to the transfer, the shirt is pre-pressed for approximately five seconds. Fabric creases are smoothed out, and excess moisture is drawn out by this. These issues don't appear significant until a transfer doesn't go through because some portion of the design didn't adhere properly due to uneven surface contact.
Lay the cured film, right side down, on top of the garment. For 15–20 seconds at medium pressure and 160–170 degrees Celsius, heat press. Wait until the garment has cooled entirely before removing the protective coating. The film splits before the adhesive sets completely using cold peel, which prevents lifting and leaves clean edges.
Once the pattern is complete, cover it with parchment paper and press for another ten seconds. This will increase resilience, which will be noticeable in the print's capacity to withstand washings over time.
Conclusion
Understanding black shirts is worthwhile. Dark thread bleaching is an inefficient method on dark fabric, thus the clothing will not be tougher than others. Unlike with default settings, each step requires intentional attention, making them tougher. Press with clean preparation, cure the transfer correctly, and apply the white ink layer correctly, and the results will stand up just as the client wants. If there’s a moment when you need custom DTF transfers from us, you can go to our website. In fact, the part of the equation involving transfers is made easy using Mad Monkey Transfers. The remaining steps are procedural.